
A Step-by-Step Guide to Investing Online
Now that you’ve settled on the index funds (a.k.a. ETFs) that you’d like to invest in, we’ll go through a step-by-step tutorial on the mechanics of how to trade online, so that you can start putting your money to work.
To illustrate, I’ll be making a trade in my Questrade brokerage account, so you’ll see some visuals from that trading platform. If you’re using a different investment broker, it will look slightly different, but the broad concepts are the same.
Side note: If you’d like to open a Questrade DIY (Do it Yourself) account for low-cost index investing, please feel free to add my referral code of 336413903418268 when you open the account. We will both receive $50 in that case!
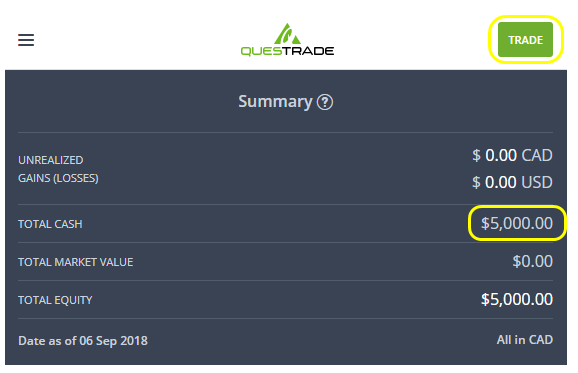
After logging into my brokerage account, first I see a summary of my portfolio. I’ve got $5,000 of cash in the account, and would like to use that money to purchase some investments. Click the “Trade” button at the top right to start.
Step 1 – Look Up the Correct Investment Symbol
Index funds are typically identified by a three to five capital letters (VCN, XAW, VAB, VOO, VTSAX, etc.). Based on your chosen asset allocation, you need to identify which index fund you want to purchase. Based on my investment plan, I’d like to use my $5,000 to buy shares in the index fund XAW, a fund holding shares of companies from all around the world, but excluding Canada.
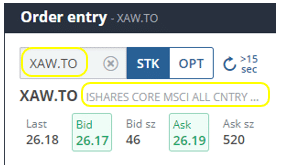
In the order entry section on the right side of the page, I type in “XAW”. Questrade actually identifies this fund as XAW.TO since it trades on the Toronto Stock Exchange. Beside the investment symbol (also known as a “ticker”), you’ll see a description of what this fund is. Verify that this is correct. I’ve done a quick google search on “XAW” and have verified that the “iShares MSCI All Country Index” is the fund I’m looking to buy.
Step 2 – Finding The Market Price of the Investment We Want to Buy (the “Ask” Price)
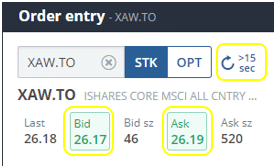
Click the refresh symbol to the right of the symbol lookup box. This will update the market price data for you.
Underneath the investment symbol information, you will see a few numbers. The only relevant figures are the “Bid” number, and the “Ask” number.
The “Bid” ($26.17 in this example), is the price at which traders currently want to buy this investment. The “Ask” ($26.19 in this example) is the price at which traders want to sell this investment. This is the market pricing for purchasing one share of this index fund.
Since we want to buy this investment now, we need to make an offer which is equal to or greater than the Ask in order for our trade to go through (a.k.a. for our trade to be “filled”).
Step 3 – Entering Your Order Details
Now that we know what investment we want to buy and the current market price of that investment, it’s time to submit your trade.
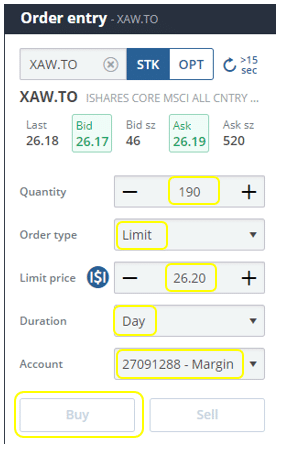
- Select the Account that you want to make the trade in
- Pick an order type of “Limit” (I’ll explain why down below)
- Enter a Limit Price that is one cent above the Ask price that we saw earlier. In this case, this means that we will submit an order to buy at a maximum price of $26.20 (one cent higher than the ask price of $26.19)
- Enter the quantity of shares that you want to purchase. To do this, divide the amount of money that you plan to invest by the limit price you’ve entered, and then round down to the nearest whole number. $5,000 divided by $26.20 is 190.84, so I round down to 190 shares.
- Choose an order duration of “Day”. This means that your order will automatically cancel if it does not complete today (i.e., if it is not filled today)
After that, click the “Buy” button. Don’t worry! The trade won’t execute now — you’ll have the opportunity to review and finalize your trade in the next step.
Step 4 – Confirm and Submit Your Trade
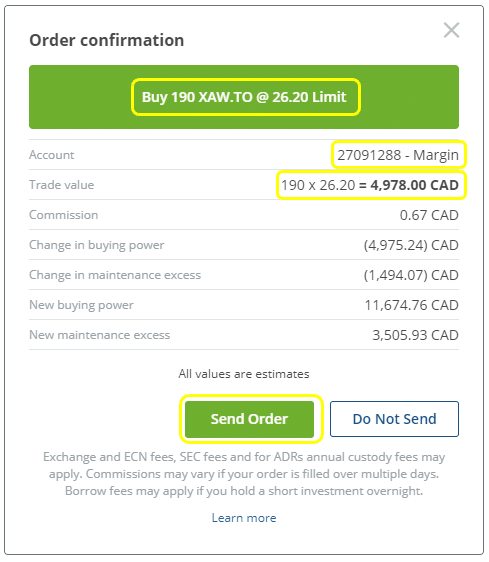
After clicking the Buy button, the order confirmation window will pop up.
In the green header bar in the top, you’ll see a summary of the trade that you are making. I am buying 190 shares of XAW, at a limit at $26.20 per share. I do a quick double check — this is correct.
Next, verify that the account info is correct, and that your trade value ($4,978 in this example) is lower than the amount of money that you plan on investing ($5,000 for me, so I am good).
Take a deep breath, read it over one more time, and click “Send Order”.
Congratulations! You’ve submitted your first trade :). I know that this might be stressful and/or might set your heart racing. I promise that it’ll get easier after the second or third time that you go through with making a trade. Just make sure you follow each step, take your time, and verify things before you move on to the next step.
Step 5 – Verify That Your Order Has Been Completed
Last step; all of the heavy lifting is behind you. Now we just need to validate that the order has gone through. Navigate to the “Executions” tab of the page.
In the picture above, you can see that my order for 190 shares of XAW has been executed. Note that my order was completed (filled) at a price of $26.19. This is consistent with the ask price of $26.19 that we saw. Even though I submitted a limit order at $26.20, I still got the best price available. Hurray!
Note: If you don’t see any confirmation here, your trade has likely not been completed yet.
Try navigating to the “orders” tab, where your pending order should be displayed there. It will likely mention that your order has been “submitted”. If so, it is likely that the market price has increased above your limit price, therefore making it possible that your order will not execute today (in which case your order would cancel itself).
If this is the case, try checking back in an hour or two to see if your trade gets filled. You could also cancel your order, refresh the market pricing and try submitting a new trade based on the the refreshed market data.
Why Use a “Limit” Order Type?
In the steps above, I recommended that you submit a “limit” order type.
As some background on this, there are two main order types – “limit” and “market”.
With a limit order, you’re able to specify the maximum price that you’re willing to buy at (or the minimum price that you are willing to sell at, if you are selling shares). This provides protection to ensure that you don’t end up buying shares at a significantly different price than you were expecting. In the example above, I specified that I did not want to buy at a price exceeding $26.20 per share.
On the other hand, a market order means that you are willing to buy at the best available price currently. Essentially, you agree to take the lowest price at that moment, regardless of what it is. Share prices can be volatile, so I don’t recommend using a market order because this can lead to some bad surprises. For example, while you are submitting your trade, the fund’s market price could increase by $1 per share, and you’d be committing to buy at that elevated price.
Keep it simple and use a “limit” order.
Why Set a Limit Price that is Higher than the Ask Price?
Now you might be asking: shouldn’t I input a limit price that is lower than the ask price, as opposed to a price higher than the ask price?
This may seem logical given that you’d “save” a cent or two on the price that you buy your shares at, but this actually creates a new risk. If the current ask price is $26.19, and you say to the market that you don’t want to purchase shares unless the price falls to $26.17 (two cents lower), your order may never go through. You are effectively saying that you won’t buy unless the market price goes down.
This is “penny wise, pound foolish”. For the opportunity to score a minuscule win (a discount of a couple cents per share), you risk that your trade doesn’t go through, meaning that you’ll miss out on investment gains. Since the market tends to go up in the long run, delaying your entry into the market only hurts you.
What Time Should You Trade At?
The main stock exchanges in Canada & the US are open between 9:30AM until 4PM on Monday to Friday (except for holidays).
As much as possible, you should submit trades during market hours. This means that you’ll need to submit your trades during the work day.
While it is possible to submit trades outside of market hours (known as pre-market trading or after-hours trading), you increase the chance that your order doesn’t go through if you do this.
Companies tend to release big news outside of market hours (before or after the trading day). As such, when this happens the prices can open at a much different value than what the previous day’s closing price was.
Because of this, if you submit a limit order based on the previous day’s closing price, your order might not go through and you will have to re-submit. Each day that you’re out of the market means that you miss out on potential investment gains.
The bottom line is that you should try to submit trades during market hours (9:30AM to 4PM on weekdays) if you can.
Takeaways: How to Trade Online
Let’s put it all together. Once you learn how to trade online and get some practice with it, purchasing investments becomes a simple recipe. Follow these five steps:
- Look up the correct investment symbol
- Find the current market price of the investment you want to buy (the ask price)
- Enter your order details (remember to use a limit order type at a price that is one cent above the ask price)
- Confirm and submit your trade
- Verify that your order has been completed
Your Assignment
- Log in to your online brokerage account and take note of the total amount of money you plan on investing
- Divide up that total amount of investment money into the different individual investments you want to make. This should be based on your chosen asset allocation (which we discussed in the previous lesson). For example, if you have $5,000 and plan to invest 60% in fund A, 30% in fund B, and 10% in fund C, you would allocate:
- $3,000 towards fund A
- $1,500 towards fund B
- $500 towards fund C
- Follow the guide above to execute each of the trades you plan to make
- Once you’ve verified that your trades have gone through, record each of the trades that you’ve made (investment fund name, # of shares, price per share, total $ value). I’ve built a spreadsheet that you can use to track your investment portfolio. This sheet has a template for you to enter your trade details, automatically pulls today’s market price data from Google Finance to show what your portfolio looks like, calculates portfolio performance metrics, and will help you automate your re-balancing calculations as well
If you’d like to open a Questrade DIY (Do it Yourself) account for low-cost index investing, please feel free to add my referral code of 336413903418268 when you open the account. We will both receive $50 in that case!
Disclaimer: This information is provided for illustrative and educational purposes only. Your situation is unique, and I do not guarantee the results or the applicability of this information to your situation.
None of this information should be considered investment advice or a recommendation to buy or sell individual securities.
Readers should do their own research before making any financial or investment decisions.


Thanks for this guide and the subsequent Google Spreadsheet document!
Cheers, thanks Elliott!
Hi,
I’ve been using Questrade for my TFSA for a few years now and it’s about time to open up an RRSP. Since it’s all online, I have an irrational fear that one day the website won’t exist and I’ll lose everything (Don’t worry, I know it’s all tracked & backed by CRA and the CDIC – hence, irrational).
I will probably open my RRSP account with them so it’s all in one place, and I know the system. My question is: Is there any downside to having both accounts in Questrade?
Hi Sher,
There aren’t any downsides that I’m aware of.
Many moons ago I started out by using TD Waterhouse, but have been migrating my investments over to Questrade in the past few years.
It’s certainly easier to have everything in one place and only deal with a single trading platform. Also, fewer tax forms to deal with in the springtime!
Makes sense, Thanks!